Showing posts with label bright fabrics. Show all posts

Thursday, June 24, 2010

Up and Coming: Wild Friends by Leslie Grainger


Alas, my little boy is 9. Eeeeek. He's not into jungle animals any more, but I still liked this new line by Leslie Grainger for Robert Kaufman. It's called Wild Friends and it's amazing.

Especially considering that boy fabric seems to be a lot more rare than girls fabric. It's just like clothes shopping for my son vs. my daughters:

Boys area has about 4 racks of clothes... basic jeans and T-shirts... maybe some polos.
Girls area has about 32 racks of clothes... Capri's, cargos, denim, flare, skinny, skirts, skorts, dresses, tanks, cami's... you get the idea.

Now what were we talking about? Oh.....So, it was nice to see a wonderful fabric set for little boys.

So, here are those pictures:


Tuesday, June 22, 2010

Outings: Shop Hop Time!

I wasn't planning on going to our local Shop Hop this year, but the draw was too strong. I just couldn't help myself.

I enjoyed the scenery and the company, and my little ones enjoyed the treats. It was so much fun.

Here are some surprises and ah-hah's that I had:

1. Meadowsweet looks nice in pictures. It looks AMAZING in real life. I was floored, and I bought some, too.


This quilt was gorgeous. I loved the simplicity of this pattern.

2. Ric rac is everywhere! I couldn't believe all the creative uses for ric rac. I especially saw lots of the huge stuff.

Sorry about these pics. I took my old camera. But notice the ric rac edging these cute felt stockings.

3. Applique! Applique! Applique! I couldn't believe how much there was. Some of these quilt shops would put Market Booths to shame. Seriously, the detail and time! It was amazing.

Loved the bold pattern and coloring on this one.

The detail on those tiny aprons and dresses was incredible. Hours and hours.

4. Accessories. There were adorable hats, bags, aprons, hair bows, and wallets.... oh my!

Sweet elephant pincushions. My photos are embarrassing me!

There's that Meadowsweet I fell in love with!

Overall, it was a success. My girls both want to go next year, although this may be for the food. I stayed in budget, which is soooo hard at these things.

What did I buy? Four Meadowsweet fat quarters, four Cosmo Cricket fat quarters (just in and cut the night before!!!), and I bought one Yard of Moda Arcadia, which is practically sold out EVERYWHERE, and happens to be my favorite all time fabric line.

It was great!

Monday, June 21, 2010

No Sew: Fabric Covered Hat Boxes


This project was so much fun. These boxes are for my girls "treasures" but they blend right in with the decor. It beats the old shoe boxes they used before. Now those were classy.

The best part: No sewing necessary!

Supplies:

Paper Mache Hat Boxes (Found at hobby stores like JoAnn, or just search online)
Fabric
Decoupage
Ribbon
Ruler
Paint brush

1. Measure those boxes!

Measure the boxes then cut your fabric to size. Give yourself a little extra to fold over so you have nice finished edges.


2. Cover those boxes.

Use your paintbrush and use a little decoupage at a time. Work your way around the box making sure to fold the edges. I folded the bottom up so it was a nice finished edge. On the top edge, I just folded it into the box.

3. Cover those lids.

I traced the circles onto my fabric. Then I cut about 1/2" past my line so I could fold the circle down the sides. Next, I cut a strip to wrap around the side of the lid. I made sure to fold both the top and bottom of the strip so the edges would be nice and finished.


4. Embellish those boxes.

Ribbon, flowers, or leave them blank. The choice is all yours!

Enjoy!

PS. Linking up to a few of my fav's...

Simply DesigningPhotobucketThe Trendy Treehouse

Make it Yours @ My Backyard EdenNightOwlCrafting

HookingupwithHoHgiveawaysGet your craft on Thurs.
 http://www.thethriftyhome.com

Site Shoutout: Moda Bake Shop

Moda Bake Shop

I don't know how I missed this before, but I just stumbled across an amazing site for free patterns. It's called Moda Bake Shop. Now, some of you are probably thinking I'm nuts, because you found this 2 years ago. If so, please pretend this post doesn't exist and check back soon for some new ideas.

Take a minute and check out what they have to offer over at Moda Bake Shop. Here are a few "recipes" that I like:

Moda Bake Shop

Moda Bake Shop : Ruffles an the quilt!!

Moda Bake Shop: Simple, beautiful runner.

Moda Bake Shop: Who doesn't love stars?

Moda Bake Shop: Love these babies!

Moda Bake Shop: Handy, dandy and lovely, to boot.

So if you are looking for more ways to use your fabric (or more reasons to go buy more fabric) then this is a great source. And just a reminder, I'm not paid to say this. I will never show you something I don't love and believe in.

Designer Spotlight: Jody Taylor


Riley Blake Designs: Nantucket Summer

Over at the Riley Blake blog, they did a spotlight on one of their fabulous new designers, Jody Taylor.

I thought I would pass along the wonderful intro they did for her.

June is turning out to be a month full of new arrivals for designer Jody Taylor.
In addition to the launch of her debut fabric line with Riley Blake Designs, Jody and her husband Jon are anxiously awaiting the arrival of their first baby. Both are due any time now!

Jody has spent most of the past ten years working as a product designer in the scrapbooking industry. Her true soft spot, however, lies in creating home décor projects, and textiles have always played an important part in that. Three years ago, she married into a quilting family and her eyes were opened to the array of contemporary fabrics popping up in the marketplace. Visiting quilt shops soon became an addictive habit. Before she knew it, she was joining in on quilting projects and had caught the bug! At the encouragement of her mother- and sister-in-law, she decided to put together some ideas for a fabric collection of her own.

Riley Blake Designs... Is that not the cutest bonnet ever?!

Nantucket Summer is her second collection, but her first with Riley Blake Designs. It was inspired by a desire to capture the bright, happy colors of summer. Jody says it’s a perfect fit for quilts, apparel, and of course, home décor. In fact, she’s using it for her baby’s nursery, which she couldn’t be more excited about!

Whether creating fabrics or patterns, Jody says her goal is to offer simple, eye-catching designs that a quilter can use to make her house feel like home—the place where hip meets homespun.

Welcome, Jody!!

You can see more right HERE.

Friday, June 18, 2010

Yards and Yards Original: The BEST Adjustable Apron Ever


I have searched and searched for the perfect apron pattern and *shock* I couldn't find what I wanted. So, I created it. And here I am sharing it with you. Please feel free to use this, but please don't copy it-- just send people back here. Thanks!

OK... so here we go. First off, this is an adjustable apron. There are no awkward ties behind the neck because the ties adjust to exactly what you want them to be. So it's nice and snug and PERFECT.

So, here is the finished product:


Alright, here are the directions. Disclaimer: There may be some errors in this. If so, let me know and I'll fix it up.

Before you start: There is some wiggle room in this pattern.

The tie can be lengthened or shortened depending on the intended user.
Pockets and ruffles are optional. I just like the cute factor.

1. Supplies:
Fabric (see measurements below)
Sewing machine (ha ha)
Thread
Rotary cutter and mat (very helpful though not necessary)
Iron
Bias Tape Maker (optional)

Cutting List:


Sm. (age 1 to 3) Med. (age 4-10) Large. (14 +)
Apron …………...see my lovely drawing below…….
Tie 72" x 2" "96"x 2" 120" x 2"
Pocket 6.5" x 10" 7" x 11" 8"x 11.5"
Pocket Ruffle 3" x 13" 3" x 14" 3" x 16"
Bottom Ruffle 3" x 36" 3" x 42" 3" x 50"


General Pattern


Step 1: Make the pattern

Using the measurements from my lovely drawing, draw the main apron piece onto wax paper. Just eyeball the curved part, connecting the lines.

Step 2: Cut the pieces.

Pick out the fabrics you want. You can decide if you want your pocket to match the apron, or be with a coordinating fabric. Same with the ruffles and tie. You can play with what you have until you like the results.

You should cut 2 apron pieces, 1 long skinny tie piece (you can sew multiple pieces together if needed), 1 pocket piece, 1 long ruffle piece, and 1 short ruffle piece.


Step 3: Make your tie.

If you have a bias tape maker feel free to use it. It will make this job a lot easier, but you can still do it without one. I know, because I have made my own bias tape for years, with no fancy tool.

To do this by hand:
a. Get your super long and skinny strip. Iron it in half, so you have an even skinnier strip.
b. Open it up and fold each side in to almost the center. Iron it.

c. Fold it back in half along the first line you made. Fold in the unfinished top and bottom edge, as shown. Iron.


d. Sew along the top, bottom, and the really long, skinny opening.

Here is an image using the bias tape maker. (About $7.00 at JoAnn Fabrics.)


Step 4: Sew the main body of the apron.

Take your 2 main apron pieces and put them right sides together. Use a 3/8" to 1/2" seam. Sew the sides, curves, and the top. **DO NOT SEW THE AREAS SHOWN BELOW. THESE ARE USED TO MAKE A CASING FOR THE TIE. LEAVE THE GAPS ABOUT 1" WIDE.


Turn it right side out and iron it. Also iron the little gaps you didn't sew. Iron them as if they are sewn so that they are just in line with the rest. Clear as mud?

This shows one of the gaps I left.

Now we sew the casing. Just sew right along the edge of both curves for extra stability. Then sew about 3/4" away from that to form a pocket for the tie to be threaded through.


5. Sew the pocket.

Take your pocket piece. Fold it in half, right sides together. Sew up the two sides.
Turn it right sides out. Iron the pocket. Then fold about 3/8" of the top raw edge down inside the pocket. Iron this well. You will pin your ruffle into the opening and sew it all shut. Turning the fabric down will give you a nice finished edge to work with.


6. Make your ruffles.

You will be making a ruffle for the bottom of the apron, as well as for the top of the pocket.

Take your two ruffle pieces. Fold it in half along the long side, right sides together. Sew the two ends shut so your ruffles have finished edges.

Turn it right side out and iron.

Finally, baste along the open edge. I just make my stitch length as long as possible and sew along that edge. Carefully pull the end threads to gather the fabric into a ruffle.


This shows the ruffle AFTER I pinned it into the pocket opening.

7. Add the ruffles to the pocket and the bottom.

Iron about 3/4" fabric along the bottom of the main apron, as shown.


Pin the ruffle in between these two layers.


Carefully sew along the edge, making sure you go through all layers.
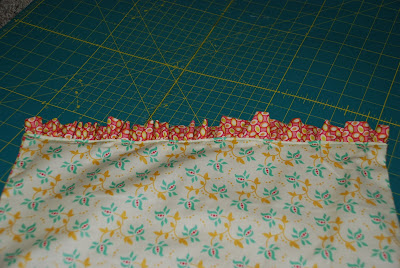


Do the same with the pocket, as shown.


8. Attach the pocket.

Pin the pocket on the front of the apron and sew the sides and bottom onto the apron. This also serves to add some stability between the two layers of the apron.


9. Thread your tie.

Attach a safety pin to the end of your tie. Carefully thread it through the bottom of one casing and down through the top of the other. Tie knots in the ends to prevent it from getting pulled all the way through.

10. Cook up a storm!! Enjoy.

Yeah, I know. She's a doll! This is the smallest apron on my 14 month old.


PS. Linking up to a few fav's...

Sumo Sweet Stuff

mmm button Keeping It SimpleThe DIY Show Off


MakingThe Girl  CreativePhotobucket