
I have searched and searched for the perfect apron pattern and *shock* I couldn't find what I wanted. So, I created it. And here I am sharing it with you. Please feel free to use this, but please don't copy it-- just send people back here. Thanks!
OK... so here we go. First off, this is an adjustable apron. There are no awkward ties behind the neck because the ties adjust to exactly what you want them to be. So it's nice and snug and PERFECT.
So, here is the finished product:

Alright, here are the directions.
Disclaimer: There may be some errors in this. If so, let me know and I'll fix it up.Before you start: There is some wiggle room in this pattern.
The tie can be lengthened or shortened depending on the intended user.
Pockets and ruffles are optional. I just like the cute factor.
1. Supplies:
Fabric (see measurements below)
Sewing machine (ha ha)
Thread
Rotary cutter and mat (very helpful though not necessary)
Iron
Bias Tape Maker (optional)
Cutting List:
| Sm. (age 1 to 3) | Med. (age 4-10) | Large. (14 +) |
| Apron | …………...see my lovely drawing below……. |
| Tie | 72" x 2" | "96"x 2" | 120" x 2" |
| Pocket | 6.5" x 10" | 7" x 11" | 8"x 11.5" |
| Pocket Ruffle | 3" x 13" | 3" x 14" | 3" x 16" |
| Bottom Ruffle | 3" x 36" | 3" x 42" | 3" x 50" |
General Pattern

Step 1: Make the pattern
Using the measurements from my lovely drawing, draw the main apron piece onto wax paper. Just eyeball the curved part, connecting the lines.
Step 2: Cut the pieces.
Pick out the fabrics you want. You can decide if you want your pocket to match the apron, or be with a coordinating fabric. Same with the ruffles and tie. You can play with what you have until you like the results.
You should cut 2 apron pieces, 1 long skinny tie piece (you can sew multiple pieces together if needed), 1 pocket piece, 1 long ruffle piece, and 1 short ruffle piece.

Step 3: Make your tie.
If you have a bias tape maker feel free to use it. It will make this job a lot easier, but you can still do it without one. I know, because I have made my own bias tape for years, with no fancy tool.
To do this by hand:
a. Get your super long and skinny strip. Iron it in half, so you have an even skinnier strip.
b. Open it up and fold each side in to almost the center. Iron it.

c. Fold it back in half along the first line you made. Fold in the unfinished top and bottom edge, as shown. Iron.

d. Sew along the top, bottom, and the really long, skinny opening.
Here is an image using the bias tape maker. (About $7.00 at JoAnn Fabrics.)

Step 4: Sew the main body of the apron.
Take your 2 main apron pieces and put them right sides together. Use a 3/8" to 1/2" seam. Sew the sides, curves, and the top. **DO NOT SEW THE AREAS SHOWN BELOW. THESE ARE USED TO MAKE A CASING FOR THE TIE. LEAVE THE GAPS ABOUT 1" WIDE.

Turn it right side out and iron it. Also iron the little gaps you didn't sew. Iron them as if they are sewn so that they are just in line with the rest. Clear as mud?

This shows one of the gaps I left.
Now we sew the casing. Just sew right along the edge of both curves for extra stability. Then sew about 3/4" away from that to form a pocket for the tie to be threaded through.


5. Sew the pocket.
Take your pocket piece. Fold it in half, right sides together. Sew up the two sides.
Turn it right sides out. Iron the pocket. Then fold about 3/8" of the top raw edge down inside the pocket. Iron this well. You will pin your ruffle into the opening and sew it all shut. Turning the fabric down will give you a nice finished edge to work with.

6. Make your ruffles.
You will be making a ruffle for the bottom of the apron, as well as for the top of the pocket.
Take your two ruffle pieces. Fold it in half along the long side, right sides together. Sew the two ends shut so your ruffles have finished edges.

Turn it right side out and iron.

Finally, baste along the open edge. I just make my stitch length as long as possible and sew along that edge. Carefully pull the end threads to gather the fabric into a ruffle.

This shows the ruffle AFTER I pinned it into the pocket opening.
7. Add the ruffles to the pocket and the bottom.
Iron about 3/4" fabric along the bottom of the main apron, as shown.

Pin the ruffle in between these two layers.

Carefully sew along the edge, making sure you go through all layers.
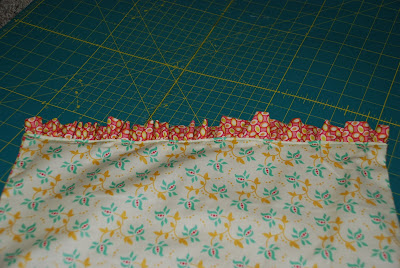
Do the same with the pocket, as shown.
8. Attach the pocket.
Pin the pocket on the front of the apron and sew the sides and bottom onto the apron. This also serves to add some stability between the two layers of the apron.

9. Thread your tie.
Attach a safety pin to the end of your tie. Carefully thread it through the bottom of one casing and down through the top of the other. Tie knots in the ends to prevent it from getting pulled all the way through.
10. Cook up a storm!! Enjoy.

Yeah, I know. She's a doll! This is the smallest apron on my 14 month old.
PS. Linking up to a few fav's...


