Thursday, June 30, 2011

Just for Fun!!! A Quick Little Giveaway!!!

Well, Yards and Yards just topped 300 followers which is kind of a cool thing for me.  So... to celebrate... let's do a for today and tomorrow!!!  We all love a good

GIVEAWAY!!!! (OR 2)

OK... here's what we'll do...

Make a comment on this post for each of the following that you do.  The more you do, the more chances you have to win:

1.  Follow Yards and Yards  (Already do, SWEET!  Count it!)
2.  Go to my Etsy shop and say which PDF Pattern is your favorite.  
3.  Pick a number between 1 and 1000 and post it in the comments.  I'll pick the closest and they will win something, too.
4.  Like Yards and Yards on Facebook.  Who doesn't need more friends? (Check my right sidebar for the button.)
5.  Post about the giveaway on your own blog.

We only have 2 days here, so go, go go!  Saturday morning I will pick 2 winners to each get a free PDF Pattern of their choice from the Yards and Yards Shop. GOOD LUCK!!!  And thanks for all the kinds comments and support these last few months.  It's been great to see this little blog and business of mine growing.

Here are a few of my patterns... just waiting to be won....

There's THIS...


 OR THIS....
 OR THIS....
 OR THIS...
Good luck!!!

Wednesday, June 29, 2011

Free Tutorial from Michael Miller: Kids' Beanbag Chair

I thinght this looked so fun, I had to share.  These bean bag chairs are so adorable and you can find the PDF Pattern over at the Michael Miller blog. 

via Michael Miller

My kids would have a blast with these and they don't actually look that hard to make!  Enjoy!!

Tuesday, June 28, 2011

Free Shipping on Fabric Bundles!!!

**** I am all out of the Aviary 2, but you can still get the Coquette*****

I just ordered more fabric and I'm attempting to make a little room in my fabric closet. SOOOO, because I can and I want to, I am offering FREE SHIPPING on all Yard Fabric Bundles in the shop. There are only a few, so head on over.

And I have some Coquette, from Pat Bravo right HERE.


PLUS, I am also offering a FREE PDF PATTERN with a bundle purchase.  Just leave a note when you buy it and it's all yours.

So, if you've been wanting to make THIS...
 OR THIS....
 OR THIS....
 OR THIS...
Then head on over to the Yards and Yards Etsy shop, pronto.  Have a fantastic week!!!!

Monday, June 27, 2011

Giveaway Alert!! Have You Gotten A Round Tuit Yet?

Happy Monday everyone!!  I hope you all had a great weekend.  I took the kids ice skating in June.  It was nice to cool off a bit, but I think we onlt lasted about 45 minutes.  Those skates are possibly the most uncomfortable things I have ever worn!  (Right up there with fake eyelashes and swimsuits in public.)  But we had a "memorable" time, for sure.

Anyhow, I am so excited to introduce you to Jill, if you haven't met her yet.  Jill is the owner and author of the blog, Creating My Way to Success.  And every Monday, Jill has a fantastic link party called A Round Tuit.  Cute, right?  Jill is definitely a girl after my own heart.

This week, I am doing a Pattern Giveaway over at Jill's Party, so head on over.  The rules are super simple and I'm sure you'll find some great inspiration in the process as well.  Here are the rules, straight off of Jill's website:

**One entry - go to Yards and Yards etsy shop and leave a comment with Jill telling her which pattern you would like to win.

**Additional entry - become a follower of Yards and Yards blog, and leave a comment here telling Jill you have done so
**Extra entry for mentioning this giveaway on your blog, facebook or twitter, and leave a comment at Jill's place telling her you have done so.
I've really enjoyed A Round Tuit parties because:

1.  It's a great place to be inspired and find fun, creative ideas.
2.  It's a fun way to showcase what I've been working on.
3.  It keeps me motivated to keep creating.

So, feel free to join in the fun!  And thanks Jill, for hosting these parties.  Keep it up!

PS.  Here are some of my new patterns you can sign up to win:


Fun stuff!!!  Enjoy the party and have a fun week.

Saturday, June 25, 2011

Introducing the Random Ruffles Baby Quilt

I have a new PDF Pattern called the Random Ruffles Baby Quilt.  If you look close, you can see that there are ruffled quilt blocks all throughout the quilt top.  It adds such a girly touch and a lovely texture to the quilt.  I really love this pattern!  AND to top it all off, it was really quite easy to make.  A beginner could definitely pull this one off and what an amazing baby blanket it makes!

I used the Aviary 2 fabrics by Joel Dewberry.  These fabrics have been a hit in the shop.  I am out of many of the fabrics, but I have his new line on order, due in the shop around mid-July.

If you are really in love with quilt, you can buy the sample quilt I made when I tested the pattern out.  It's also in my shop right HERE.  The quilt has only the very best materials and was made completely by me!  It even has an amazing cuddle fabric backing.  Enjoy the show!!!


So sweet!!! I am thrilled with how this one turned out!


PS.  Linked Up...

*All Things Heart and Home  *  It's Sew For You  *  Not Just a Housewife  *  Creative Itch  *  Quiltstory Ladybug Blessings  *  Sew Much Ado  *  Trendy Treehouse  *  Sew Chatty * Women Who Do It AllSugar and Dots * Li'l Luna * Tea Rose Home * Polka Dots on Parade * Somewhat SimpleFireflies and Jellybeans  *  Blue Cricket Design  *  733 blog  *  House of Hepworth's  * Paisley Passions  *  A Glimpse Inside  *  Fingerprints On the Fridge  *  Fun To Craft  *  At The Picket Fence  *  Stuff and Nonsense  *  Inspiring Creations * Just a GirlSassy Sites504 Main  *  WhipperBerry  *  Sew Many Ways  *  The Girl Creative  *  Making the World Cuter  *  A Round Tuit  *  Sumo's Sweet Stuff  *  Life Made Lovely  *  C.R.A.F.T.  *  Sew Modern Monday  *  Today's Creative Blog  *  Pinkapotamus * Cherished Bliss  *Ginger Snap Crafts*

Thursday, June 23, 2011

Heads Up: Cosmo Cricket's Circa 1934

This fabric is definitely in my top 10 from Salt Lake Quilt Market.  It's called "Circa 1934" by Cosmo Circket fore Moda.  I love the rustic look and I love that it's so different.

Here are the other Colorways:


What's your favorite?  Or is this not your style?

Tuesday, June 21, 2011

Sweet Summer Handbag, Anyone?

Wow!  What a fun/crazy/messy couple of weeks I've had!!  We have been to the Oregon Coast and back, to Park City, Utah and back, and fit piano, basketball, parties, races, and some sewing into the middle of all of it!! 

And now, to add a bit of fun to the mix, I'm doing a fun GIVEAWAY with SewSara.  We are giving away a FREE Yards and Yards PDF Pattern and a $10 SewSara credit to her Etsy shop!!!  Her blog is so filled with inspiration and amazing ideas.  You can find her right HERE.  Prepare for some fun ideas and inspiration.

AND, as if I needed more fun in my busy summer, I've been working on a new pattern for the Yards and Yards Shop.  I finally finished this baby and you can get it right HERE.  It's the sweetest summer handbag ever!!!  Perfect for those days out shopping or those outings with the kids.  Check out these pictures:


I saw a cute ruffle shirt and thought, "That would make a great handbag."  Do you ever do that?  I guess it's something about sewing... I see sewing patterns in everything.  Funny.  Anyhow, I'm off to more craziness.  Enjoy!!!

PS.  Linked Up...

*All Things Heart and Home  *  It's Sew For You  *  Not Just a Housewife  *  Creative Itch  *  Quiltstory Ladybug Blessings  *  Sew Much Ado  *  Trendy Treehouse  *  Sew Chatty * Women Who Do It AllSugar and Dots * Li'l Luna * Tea Rose Home * Polka Dots on Parade * Somewhat SimpleFireflies and Jellybeans  *  Blue Cricket Design  *  733 blog  *  House of Hepworth's  * Paisley Passions  *  A Glimpse Inside  *  Fingerprints On the Fridge  *  Fun To Craft  *  At The Picket Fence  *  Stuff and Nonsense  *  Inspiring Creations * Just a GirlSassy Sites504 Main  *  WhipperBerry  *  Sew Many Ways  *  The Girl Creative  *  Making the World Cuter  *  A Round Tuit  *  Sumo's Sweet Stuff  *  Life Made Lovely  *  C.R.A.F.T.  *  Sew Modern Monday  *  Today's Creative Blog  *  Pinkapotamus * Cherished Bliss  *Ginger Snap Crafts*

Monday, June 20, 2011

Inspiration Time!! SewSara.... and a GIVEAWAY!!

Happy Moday, everyone!!  I am back from an amazing adventure called RAGNAR.  Not for me, but for my husband.  He ran the Wasatch Back RAGNAR race with a 12 person relay team.  It's was 192 miles and I was thrilled to get to watch him.  My 10-year old ran the last 2 miles with him and I'm still beaming!

But... on to fabric, right?  I have an amazing crafter to share with you today.  I was so happy to "meet" Sara online.  She does some amazing stuff.  Her blog is called SewSara.  You can jog on over and find creativity everywhere!!  She offers tutorial like THIS one for thoses fabulous Towel Bibs.  Have you ever used one of these for your babies?  They are awesome!


She also has a sweet Etsy shop.  My new favorite over there are the Hex Kits.  I've been on a Hex kick lately.  They are the best thing ever for making on a long drive.

But she also has Applique Birthday T-shirts like this:


And those super soft Baby Minky Blankets.


So head on over to SewSara and see what she has to offer.  I'm offering a Yards and Yards PDF Pattern giveaway over there this week.  PLUS.... Sara is offering a $10 SewSara credit as well.  I wasn't even planning on that extra surprise!!!  What a sweet gal!  You can enter multiple time:


1- Follow Yards and Yards blog
2-  Follow SewSara
3-  Like Yards and Yards (I know... I decided to try the Facebook thing!!)
4- Like SewSara on Facebook
5- Just comment on Sara's post about my giveaway about which pattern you would choose.


Good luck!!!!

Thursday, June 16, 2011

Michael Miller: Color Stories

I noticed at Quilt Market in Salt Lake that Michael Miller Fabrics is trying something a bit different.  I'm still not sure how I feel about it since I love to know the designers and I learn which designers match my style.  But these "Color Stories" are exactly what they sound like.  They are fabrics matched by colors. 

They have a ton you can check out right here at the Michael Miller site.

But, here is the one that really jumped out to me at Market.  It's called Citron Gray.  And can you guess my very favorite print?  It's the gray polka dots.  I guess I have a polka dot spot  in my heart.

Wednesday, June 15, 2011

I'm Back!!!

Just dropping in really quick to say that I am abck from the Oregon Coast.  I will write more later.  But I do have time to say, it was lovely!!!

Now.... off to laundry...

Thursday, June 9, 2011

I Wanna Try This...

Yesterday was one of those days.  Really, it's almost laughable.  I have been watching my sister's 3 kids for a few days along with my 4, which is hilarious right there. 

Then yesterday morning, my 4-year old starts running around the house holding her neck, screaming at the top of her lungs.  She wouldn't let me come near her, but she wanted help.  Oh... and did I metion, ny husband is away on business?

Anyhow, we ended up in the E.R. with... a charlie horse of the neck that wouldn't go away!  So, after who knows how much money, 2 different doctor visits, 3 x-rays.... we walked away with a neck cramp.  I am so grateful that's all it was, but I am WORN OUT!! 

Oh, and did I mention, I was cleaning the house and trying to do laundry and pack for a vacation while this is all  happening? 

Thank heaven for mothers!  I have an amazing mom, who saved the day.  I am sure I will never outgrow my mom.

So... with that, I really want to try something like this:

This is from the blog Twin Fibers.  Isn't this top AMAZING!  Seriously, you will love what they do!!

Tuesday, June 7, 2011

Free Tutorial: Adjustable Apron


I've made these for about a year now, and they are definite winners.  So here it is... my adjustable apron pattern!! And here I am sharing it with you. Please feel free to use this, but please don't copy it-- just send people back here. Thanks!

OK... so here we go. First off, this is an adjustable apron. There are no awkward ties behind the neck because the ties adjust to exactly what you want them to be. So it's nice and snug and PERFECT.

So, here is the finished product.  The neck tie and the waist ties are all the same tie, so you can adjust this apron perfectly!!


Let's get going...
Before you start: There is some wiggle room in this pattern.

The tie can be lengthened or shortened depending on the intended user.
Pockets and ruffles are optional. I just like the cute factor.

1. Supplies:
Fabric (see measurements below)
Sewing machine (ha ha)
Thread
Rotary cutter and mat (very helpful though not necessary)
Iron
Bias Tape Maker (optional)

Cutting List:


Sm. (age 1 to 3)Med. (age 4-10)Large. (14 +)
Apron…………...see my lovely drawing below…….
Tie72" x 2""96"x 2"120" x 2"
Pocket6.5" x 10"7" x 11"8"x 11.5"
Pocket Ruffle3" x 13"3" x 14"3" x 16"
Bottom Ruffle3" x 36"3" x 42"3" x 50"


General Pattern


Step 1: Make the pattern

Using the measurements from my lovely drawing, draw the main apron piece onto wax paper. Just eyeball the curved part, connecting the lines.

Step 2: Cut the pieces.

Pick out the fabrics you want. You can decide if you want your pocket to match the apron, or be with a coordinating fabric. Same with the ruffles and tie. You can play with what you have until you like the results.

You should cut 2 apron pieces, 1 long skinny tie piece (you can sew multiple pieces together if needed), 1 pocket piece, 1 long ruffle piece, and 1 short ruffle piece.


Step 3: Make your tie.

If you have a bias tape maker feel free to use it. It will make this job a lot easier, but you can still do it without one. I know, because I have made my own bias tape for years, with no fancy tool.

To do this by hand:
a. Get your super long and skinny strip. Iron it in half, so you have an even skinnier strip.
b. Open it up and fold each side in to almost the center. Iron it.

c. Fold it back in half along the first line you made. Fold in the unfinished top and bottom edge, as shown. Iron.


d. Sew along the top, bottom, and the really long, skinny opening.

Here is an image using the bias tape maker. (About $7.00 at JoAnn Fabrics.)


Step 4: Sew the main body of the apron.

Take your 2 main apron pieces and put them right sides together. Use a 3/8" to 1/2" seam. Sew the sides, curves, and the top. **DO NOT SEW THE AREAS SHOWN BELOW. THESE ARE USED TO MAKE A CASING FOR THE TIE. LEAVE THE GAPS ABOUT 1" WIDE.


Turn it right side out and iron it. Also iron the little gaps you didn't sew. Iron them as if they are sewn so that they are just in line with the rest. Clear as mud?

This shows one of the gaps I left.

Now we sew the casing. Just sew right along the edge of both curves for extra stability. Then sew about 3/4" away from that to form a pocket for the tie to be threaded through.


5. Sew the pocket.

Take your pocket piece. Fold it in half, right sides together. Sew up the two sides.
Turn it right sides out. Iron the pocket. Then fold about 3/8" of the top raw edge down inside the pocket. Iron this well. You will pin your ruffle into the opening and sew it all shut. Turning the fabric down will give you a nice finished edge to work with.

6. Make your ruffles.

You will be making a ruffle for the bottom of the apron, as well as for the top of the pocket.

Take your two ruffle pieces. Fold it in half along the long side, right sides together. Sew the two ends shut so your ruffles have finished edges.

Turn it right side out and iron.

Finally, baste along the open edge. I just make my stitch length as long as possible and sew along that edge. Carefully pull the end threads to gather the fabric into a ruffle.


This shows the ruffle AFTER I pinned it into the pocket opening.

7. Add the ruffles to the pocket and the bottom.

Iron about 3/4" fabric along the bottom of the main apron, as shown.


Pin the ruffle in between these two layers.


Carefully sew along the edge, making sure you go through all layers.


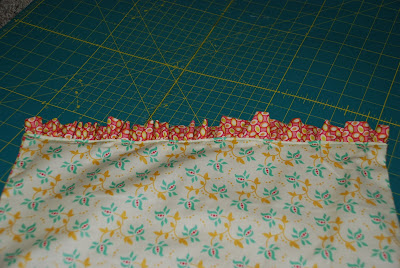
Do the same with the pocket, as shown.


8. Attach the pocket.

Pin the pocket on the front of the apron and sew the sides and bottom onto the apron. This also serves to add some stability between the two layers of the apron.


9. Thread your tie.

Attach a safety pin to the end of your tie. Carefully thread it through the bottom of one casing and down through the top of the other. Tie knots in the ends to prevent it from getting pulled all the way through.

10. Cook up a storm!! Enjoy.

Yeah, I know. She's a doll! This is the smallest apron on my 14 month old.