Wednesday, May 4, 2011

I've Been Busy!

I've been sewing and sewing with the lovely Coquette fabric.  You can get it from my shop right HERE.  It's really amazing to work with and it's out of my comfort zone so it's been double the fun to experiment with.


So, what have I been sewing?  Another bag???

Except this one is for my daughter's scriptures.  She has been needing one fora a while now and I finally goat around to doing it.  I made it messenger bag style... because it's different.

It even has a little pocket in the front and loops in the top to put scipture pencils in.  Needless to say, she adores this thing, which makes me feel like a happy mom!

Hopefully, I'll get around to a nice pattern for this one soon.  I looked around at what is out there, and there are not a lot of options.  So, I plan on making my own option!  

Pssssssst.  I now have the pattern in my Etsy shop.


PS.  I linked to some SUPER SEWING parties!

*All Things Heart and Home  *  It's Sew For You  *  Not Just a Housewife  *  Creative Itch  *  Quiltstory  *  Ladybug Blessings  *  Sew Much Ado  *  Trendy Treehouse  *  Sew Chatty * Women Who Do It All *  Sugar and Dots * Li'l Luna * Tea Rose Home * Polka Dots on Parade * Somewhat Simple *  Fireflies and Jellybeans  *  Blue Cricket Design  *  733 blog  *  House of Hepworth's  * Paisley Passions  *  A Glimpse Inside  *  Fingerprints On the Fridge  *  Fun To Craft  *  At The Picket Fence  *  Stuff and Nonsense  *  Inspiring Creations * Just a Girl *  Sassy Sites*  504 Main  *  WhipperBerry

Tuesday, May 3, 2011

Up and Coming: Curio by BasicGrey

This line, called Curio, is coming out this September from Moda. It looks just lovely! I am sure I could find some good uses for this stuff! How about you?


Kind of vintage/shabby feel to it.  I could live with a few bolts of this.  

Thursday, April 28, 2011

Coquette Inspiration: Just a Guy Who Quilts

I've been digging around for some Coquette inspiration.  I just love to daycream about what I can do with THIS fun bundle.  So far, I've made skirts and a scripture bag (more on that later.)  But I still love to see what others see in this fabric.
(you can see more HERE)

And lucky day!  I stumbled across an amazing blog called, "I'm Just a Guy Who Quilts."  And that's an accurate blog description, for sure! 

Ryan Walsh interviewed Pat Bravo a few months back, and I found this amazing inspiration photo in his blog entry.  I love this picture!
via I'm Just a Guy Who Quilts

See all the Coquette beautiness?  I am especially in love with the 3 framed fabrics across the top.  It's lovely!  That happens to be my favorite Coquette fabric.  Check it out:

Can you see why you'd want to frame that and hang it on your wall?  Anyhow, I just had to share.  Enjoy!

Tuesday, April 26, 2011

Easy Peasy Skirt Tutorial

Great news!  I am back from my trip and we had a great time visiting the Navajo Nation.  My sister and her family live there so we stayed with them for a few days.  We even had an authentic Navajo Taco Easter dinner!  Good times! 

Now that I have done the laundry, put away suitcases, cleaned out the van (OK, my sweet husband did the van), and finished my book, I am reaedy to add the turial for the skirts.  These are soooo easy and if I had a girl who would wear skirts to school, I could have her 10 skirts in an hour, I bet!

So, here is the finished product. 

I used the amazing fabric from Pat Bravo called Coquette.  You can buy a bundle of this for a great deal at my Etsy shop, Yards and Yards. 


The things about this fabric is that it feels amazing!  I have worked with a lot of fabric over the years and this is by far, the best cotton for clothing that I have ever felt.  I LOVE THIS STUFF!

So here we go.

I apologize in advance for my snazzy artwork.

1.  Gather your supplies:
Sewing machine
Fabric (about 1/2 yard of A and 1/4 yard B for a skirt to go up to 6T)
Elastic (about 18")
Thread
Scissors (seriously, did I need to type that?)

2.  Cut your fabric.
Note: I made this skirt my my 4, almost 5-year old.  Adjust the measurments as needed.
Fabric A (main fabric of skirt):  42" x 14"
Fabric B (bottom contrasting fabric): 42" x 6"

3.  Take fabric A and fold about 3/4" across the bottom and iron.  You should fold it so wrong sides are together.  NOTE:  I shaded to show the patterned side of the fabric. 

  4.  Take fabric B.  Fold it in half, wrong sides together and iron.


 5.  Sew A to B.  Place A right side down on your table.  Put fabric B on top lining up the raw edges with the folded edge of fabric A.  They should over lap about an inch.  Pin.  Sew two lines across the fabric as shown.  Mine are about 1/4" and 1/2" from where the fabrics meet.


6.Fold your skirt, right sides together and sew up the side, as shown.
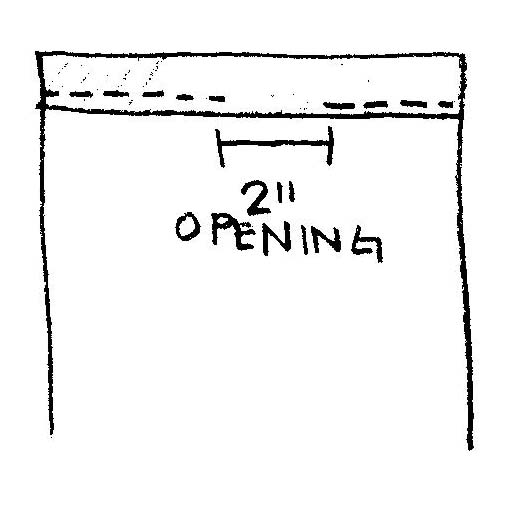
 7.  Sew a casing along the top of the skirt.  Fold the top of the skirt down about 1/2 " and iron.  Then fold it down again about 1/4" wider than your elastic.  My elastic was 1/2" so I fold it down about 3/4".  Iron again.  Then sew around the entire opening leaving a 2" opening to put your elsatic through.

8.  Attach your elastic to a safety pin (couldn't you tell from my drawing?) and thread it through the hole.  Carefully work the elastic through the hole, holding the end of the elastic in your mouth... or at least, that's how I do it.
 9.  Pin and sew the two ends of the elastic together. I go back and forth about 10 times since this really has to hold up well.

10.  Sew the 2" opening closed.  You are done! Enjoy!

PS.  I linked to some SUPER SEWING parties!

*All Things Heart and Home  *  It's Sew For You  *  Not Just a Housewife  *  Creative Itch  *  Quiltstory  *  Ladybug Blessings  *  Sew Much Ado  *  Trendy Treehouse  *  Sew Chatty * Women Who Do It All *  Sugar and Dots * Li'l Luna * Tea Rose Home * Polka Dots on Parade * Somewhat Simple *  Fireflies and Jellybeans  *  Blue Cricket Design  *  733 blog  *  House of Hepworth's  * Paisley Passions  *  A Glimpse Inside  *  Fingerprints On the Fridge  *  Fun To Craft  *  At The Picket Fence  *  Stuff and Nonsense  *  Inspiring Creations * Just a Girl *  Sassy Sites*  504 Main  *  WhipperBerry

Wednesday, April 20, 2011

Super Easy Easter Skirt


As you may have seen, I have some fun new fabrics in the shop. The latest is called Coquette, by Pat Bravo with Art Gallery Fabrics. It's so beautiful in person and I can't wait to get to work on it!
In the mean time, I'm having so much fun with Aviary 2, by Joel Dewberry. Here it is:


Todays project was an Easter skirt and headband for my sweet little 8 year old. Here she is modeling the headband. I even ruffled it! This headband is really nice because you hardly notice that it's on. It's really comfortable!
And here is the skirt and our cat. This skirt was SOOO easy. It took maybe 30 minutes start to finish. The headband took longer! Don't her white socks go great with this? She's a doll!


I'm planning another one for my 4 year old using this Coquette fabric as the main part of the skirt. I will post this ridiculously easy tutorial along with pics of the skirt sometime soon.

Tuesday, April 19, 2011

Heads Up! Coquette Is In!

Just a quick heads up to all my favorite blog buddies... Pat Bravo's new release, Coquette, is all bundles and ready to go over at my Etsy shop.
I love this feminie line and the beautiful, intricate designs. I think the large floral is my FAVORITE of all. Here are a few of the fabrics in the bundle:


See what I mean? The grays in this line are a lot of fun.


When you see this all together, it just gets the creative juices flowing.

Stay tuned for a super easy skirt tutorial coming soon. Seriously, it's easy. It took 20 minutes tops and it's so sweet.


No Sew: Fabric Cards Template

I've had a few requests for the template for these two cards, so here you go. Please and thank you, for only using these for personal use. And if you blog about them, please link back here.

So I tried this and it worked:

1. Click on the image.
2. Right click and copy.
3. Paste into Word.
4. Adjust and print.

I hope it works for you!! Enjoy. I keep think I should make a buch of these and give them to my mom and MIL for Mother's Day. It would be a cute gift... that would keep giving.